How to Tell if a User is Using Your Website or Your App
Updated on 16. May 2025 by Jan Bunk

There are many cases where it can be useful to differentiate between a person who is viewing your website in the browser and a person who is viewing it through your app. Maybe you want to view analytics for how well your app is being adopted by users or you want to show different content to app users.
Just like there are multiple use cases, there are also multiple ways to achieve this goal. Let's go through them one by one.
Based on the User Agent
If you don't want to enable that option, check out the other filtering methods presented in this article.
The user agent is a short string that the browser sends to websites whenever it is loading a page. The user agent contains information about the browser, for example a Firefox browser could send something like this user agent:
Mozilla/5.0 (Windows NT 6.1; Win64; x64; rv:47.0) Gecko/20100101 Firefox/47.0From that, your website can detect that the user is using version 47.0 of the Mozilla Firefox browser. Just like browsers, your app also sends a user agent that identifies it.
User Agents Used by the App
The app uses a few different user agents:
- $regularUserAgent App-WebView ($operatingSystem) $version
This is the typical user agent used by the app's internal browser (which displays your website inside the app). Requests made with this user agent are initiated by the app user by navigating between pages. - App-HttpClient $version
This is the user agent used for requests made by the app that are not directly initiated by the user. For example the app makes some requests with this to store parts of the website for offline use. The offline mode is disabled by default nowadays, so you probably won't see many requests with this user agent.
$version is the internal version of the app (e.g. 1.4.8+52) and $operatingSystem is the platform the app is being used on (e.g. ios or android).
$regularUserAgent is the user agent of a mobile browser that would be expected from the device, like Mozilla/5.0 (iPhone; CPU iPhone OS 12_2 like Mac OS X) AppleWebKit/605.1.15 (KHTML, like Gecko) Mobile/15E148
So an example user-agent that the app could use on iOS would be: Mozilla/5.0 (iPhone; CPU iPhone OS 12_2 like Mac OS X) AppleWebKit/605.1.15 (KHTML, like Gecko) Mobile/15E148 App-WebView (ios) 1.4.8+52
In your navigation settings there's also the option to make $regularUserAgent look more like that of a normal browser (as opposed to a WebView). This would for example add Safari/605.1.15 after Mobile/15E148.
Filtering for the App's User Agent
Based on the above user agent format, you can detect that your website is being loaded by the app by checking whether the user agent contains "App-WebView". If you want to check for the operating system too, you can additionally check whether the user agent also contains "(android)" or "(ios)".
Example: Showing Different Content on a WordPress Website
With the Default WordPress Editor
If you're using WordPress, you can use the "UserAgent Content Switcher" plugin. The name of the plugin is quite descriptive: it allows you to show different content to users based on their user agent. Here's how you can set it up (and an example use case):
- Install the plugin on your website. Please note that we are not affiliated with the plugin or it's developer, we just tested it and it seemed to be free and worked fine.
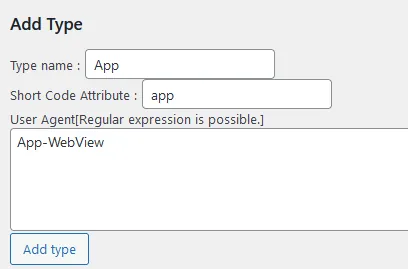
- On the plugin's settings page, add a new type with these settings:
- Type name: App
- Short-code Attribute: app
- User Agent: App-WebView

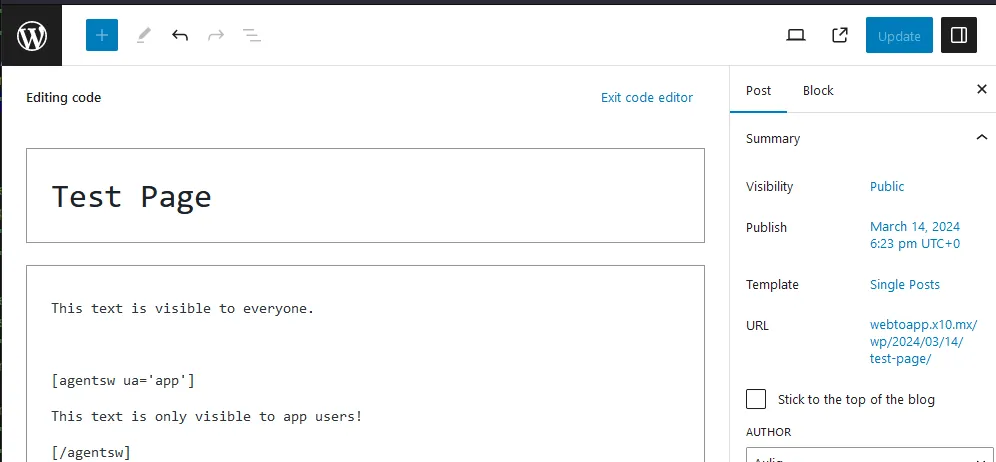
- Edit one of your pages and switch to the code editor.
- Now you can create sections that are only visible in the app like this:
This text is visible to everyone.

[agentsw ua='app']
This text is only visible to app users!
[/agentsw]
With Elementor
If you're using Elementor, you can instead use the free Powerpack plugin with the powerpack-webtoapp extension plugin. Here's how it works:
- Install the Powerpack plugin through the WordPress store.
- Download the powerpack-webtoapp plugin as a zip file and install it.The powerpack-webtoapp plugin (and the idea to use Powerpack on Elementor websites) was created by ALL IN APPLI. They use the plugin to manage multiple webtoapp.design apps and generously decided to share it.
- Now you can set specific elements to only be displayed in the app.

Using JavaScript
Based on the User Agent
Of course you can not only check the user agent on the server side (as detailed in the previous section), but also in JavaScript.
Here's an example of how you can use JavaScript to detect whether the user is using the app or a browser:
const isApp = navigator.userAgent.includes("App-WebView");
if (isApp) {
    console.log("The user is using the app.");
} else {
    console.log("The user is using a browser.");
}
getAppPlatform from the app helper script, which works very similarly.By Checking for HTML Modifications
The app makes tiny invisible changes to the website HTML which are necessary for some features of the app. We can also use these changes to detect whether the page was loaded by the app.
Since this is a bit tricky, we recommend that you use executeWhenAppReady from the app helper script. Then you can put any code inside the executeWhenAppReady function, and it will only be executed if the page was loaded by the app. A slight downside of this method is that it takes a few milliseconds before the code gets executed, even if the page was loaded by the app.
By Injecting Code into the App
On your website customization page you have the option to add any JavaScript or CSS that the app should inject into every page that is loaded. The possibilities are endless with this, but as an example, let's make this text green in the app:
<p id="red-text" style="color: red;">This text is red in the browser.</p>Now we could configure this JavaScript to inject:
document.getElementById("red-text").style.color = "green";Or alternatively, this CSS to inject:
#red-text {
    color: green !important;
}
So as you can see, this also works as a way of having different behaviour on the website than the app.
Related Articles

Progressive Web Apps vs. Native Apps
Do you want to take your website to the next level? Here's how progressive web apps stack up against standard native apps and turning your website into an app.

We Published 238 Apps - Here's How Long App Review Took
We published a lot of apps and tracked how long it took to get them into the app stores, including app rejection and resubmission times.

How to: Use Password Autofill in Your App
Password saving and automatic filling makes logging in more convenient for your app users. Here's how it works and what additional setup is needed.

Jan Bunk
With a background in computer science, Jan founded webtoapp.design in 2019 and developed the underlying software to convert websites into apps. With experience and feedback gathered from hundreds of published apps, he strives to write easy to follow guides that help you with everything related to app creation, publishing and maintenance.